6/30/2011

Next Week is Coupon Week


Next week, we will be starting a new feature called the Coupon Grab Bag. If your thrifty, then you know that coupons are an essential way of life.

I clip hundreds of coupons a week. I clip every single coupon from my Sunday paper and All You magazine subscription. Hey, I don't pay for them to just throw valuable money away! Well, I have many, many coupons for dog food, dog treats, cat food, and cat treats. I don't own a dog or a cat and don't plan on getting one anytime soon, so I have no use for these coupons. In addition, I have many almond, peanut, and pistachio coupons. I am highly allergic to nuts, therefore I'll never use these coupons. This is where the Coupon Grab Bag comes in. Every week, we'll post an updated list of coupons that are up for grabs. We ask that in turn for "grabbing" some coupons on the list, you send us any coupons you have that you won't use. We will then update the list with coupons sent to us from you!

Following the premiere of the Coupon Grab Bag, we will be starting a series on How to Become an Expert at Couponing. So stay on the lookout for that on Monday as well.

6/29/2011

Making $ doing surveys

If you're looking for a good company to do paid surveys for, Opinion Outpost is a good one. I cashed in my first Amazon gift card with them and I got the code for it immediately. All surveys pay at least $1. Some survey companies are kind of shady but this one is worth it in my opinion.

Sign up here!

There are lots of other survey companies out there, who do you use?

6/25/2011

A Simple Way to Store Your Breast Milk

Don't you hate when you bag up breast milk and put it in the freezer? Next thing you know, you have clumpy, awkward bags taking over your freezer. Well, I stumbled upon a great tutorial last week, for breast milk storage. This is an awesome idea. You can watch the full version, or click on the top right corner after pressing play, to watch the shorter version. The materials needed are listed after the video.


Materials Needed:
  • Breast milk storage bags 
  • A standard sized gift bag
  • A pair of scissors
  • Scotch tape


Thanks to the greenlitebites's Channel for sharing this awesome video!


    Summer Escapes 15 Foot Pool Review


    Luke's 3rd birthday party was last weekend, and we're still trying to recuperate from it. It's been in the high 80's to low 90's all this week, so Delvin has been taking Luke swimming a lot. Last year we bought a 12 foot Intex pool from Wal-Mart towards the end of the season on clearance. We got to use it for about a month before we had to pack it away. Well, this year we have an extra family member, so we decided to sell our 12 foot pool and get a bigger one. We decided on the Summer Escapes 15 foot round pool. It is great quality, and it came with a ground cloth, cover, and accessories kit (vacuum, skimmer, and an extra filter). The one we had last year, had the pump that sits on the ground, but the new one has the pump that attaches to the side with the skimmer, which is great. No bugs, or pool of water on the ground. It's great! And it's deeper then our old one, which is good for the grown ups. We're hoping to have Luke swimming with little to no help by next summer. He loves swimming with our help now though.

    If you don't have a lot of land, or can't afford to get a pool installed, this is the next best thing. The price is reasonable, and as long as you take care of it properly, it will last. There isn't much of a difference in maintenance between a small (10'-18') pool and a professionally installed (20'-40') pool. Of course, you use less product, but you still have to maintain the pool on an everyday basis. It's very simple once you get the hang of it.

    Overall, I would give the Summer Escapes 15 Foot Pool a 10/10. For the price compared to the value you get, I definitely think this pool is worth it.

    **Note: I have not been compensated by Summer Escapes in any way for the review of this product. This is my families personal experience with this swimming pool.**

    6/20/2011

    Last Week's Poll Results

    Last week, Amy asked "Do you use cloth diapers?". The poll is closed and the results are in. Here they are...

    Do you use cloth diapers?

    A) Yes, only cloth.
    B) Yes, both cloth and disposables.
    C) No, but I would consider it.
    D) No, never!
    E) I don't have kids.

    According to our readers, 66% answered B) Yes, both cloth and disposables. The rest of our readers answered A) Yes, only cloth.

    We also posted this poll on our Facebook page this week, and we got a good amount of votes. Five people chose B) Yes, both cloth and disposables, and unfortunately seven people chose D) No, never! :-(

    Amy just wrote a post on Eight Weeks to a Cloth Diapering Stash at $20 Per Week - Week One. Maybe this will encourage some of our readers who voted D) No, never! to reconsider. 

    Eight Weeks to a Cloth Diapering Stash at $20 Per Week - Week One

    When I was pregnant with my son I was interested in cloth diapering. I asked around on a message board where I knew that a few moms used cloth diapers. I remember someone mentioning bumGenius and I checked out the diapers. I remember thinking that there was no way I could buy 12 or more diapers like that up front. I knew that cloth diapering would save money in the long run, but I didn't have money like that to start.

    "cute" diaper: Fuzzibunz onesize
    There are essentially two kinds of people who cloth diaper. Those who have money and those who don't. In case you're wondering, I fall more into the second group. Some moms cloth diaper to save money and some do it for environmental or health reasons. Cloth diapers are also really cute! I have talked about how to save on cloth diapers before, but I wanted to do something different. I wanted to show you how to start cloth diapering by spending no more than you would normally spend on disposables. Most of the examples I will give you will be without using sales or coupons. If you find coupons or good sales, the price could be even cheaper. The first week or two might suck, but it would be worth it in the end. I will post what to do week by week for 8 weeks (the posts won't be a week apart though,) by 8 weeks you will have a decent diaper stash and can start spending that diaper money on other things (or buying more cloth diapers, if you need them.) My hope is that this little "project" will help someone be able to cloth diaper who didn't otherwise think that  they could afford it.

    For the purpose of this "experiment" I am going to say that $20 per week is spent on disposable diapers. That is how much you would spend if you bought one big package of disposables a week. I know that I used more than one package a week when my son was a newborn, so your actual cost may be slightly more or less. I do NOT recommend using the cheap Gerber prefolds/covers that they sell at Wal-Mart or Target. Those prefolds are junk and don't work in diapers very well. If you happen to have $50 to spend upfront, I recommend this kit. It contains 12 prefold diapers, 3 covers and a wetbag. Use it for the first week instead of what I recommend, if you only have $20, read on:


    Week One:
    receiving blanket folded into quarters
    The very first thing you should do (if you haven't already) is sign up for Swag bucks. My guide to Swagbucks can be found here. It may take a while to earn the swag bucks but it is totally worth it. Once you earn 450 you can trade them in for a $5 Amazon gift card. Amazon has lots of cloth diapers and free shipping with Amazon mom. By the end of the 8 weeks you should have at least one or two gift cards.
    Almost all moms have some receiving blankets. I am assuming that you have at least 4. You will need at least 12 for the first week. If you have more, great! If not, head out to a thrift store or kids consignment store. I've seen them at both for $.25 each. Buy 8 so that you have a dozen. This should last for a day, more is better so if you had more to begin with you're doing good. Cost: $2.00 Now head over to cottonbabies.com and buy two Econobum one-size covers. I snagged a Flip cover on cottonbabies for $9 (normally $14) once so check clearance first just to make sure there are no cheaper covers on sale. There are many covers out there but this is one of the cheapest places that has free shipping. Total cost: $20. If you have a few extra bucks throw in a snappi with your order for $3.95. If not, find some diaper pins somewhere for the first week. My mom still has the pins she used with MY diapers 24 years ago, she uses them to pin socks together. If you prefer to shop on Amazon (free and faster shipping with Amazon mom) try this Kushies cover. It is "two sized" so you might get a better fit. If you just don't have the money to spend on the cover and wait for it to arrive, pick up a couple pairs of the icky plastic pants from Wal-Mart or Target. These are pretty much the worst of the worst when it comes to cloth diapering, but they'll work in a pinch. These are super cheap so if you buy them, buy more receiving blankets so that you can go longer without washing.

    What about wipes?
    I didn't factor the cost of wipes into this experiment so I am assuming you have some already. I used disposable wipes with my cloth diapers for about a year before making the switch to cloth wipes. If you do want to use cloth wipes baby wash cloths, pieces of flannel or cut up receiving blankets work well. Stuff the pieces into a disposable wipes container with water and a tiny bit of baby soap.

    Now you have your diapers, what do you do?
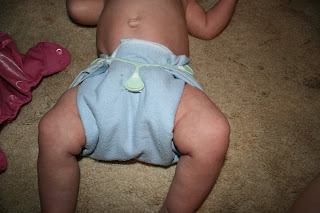
    Mikaela in a receiving blanket "diaper"
    We are going to use the receiving blankets like a flat diaper. There are many ways to fold flat diapers but for those who are new (or those, like me, who are lazy) to cloth diapering might find these folds intimidating. Instead fold the diaper into quarters (shown above) and use it like a prefold. Check out this site for different folds, it's an older site but I think she does a good job explaining. I prefer the newspaper fold, for a small baby, if your baby is larger you can simply tri-fold and stick it in the cover. I am certainly not the best at folding prefolds or flats so if I can do it, you can do it! This may not look perfect but it held up great under a cover.

    Washing Diapers - How to:
    I have posted before about laundry issues with cloth diapering. I realize that many people don't have the extra money to spend for a cloth diaper specific detergent, so for this week just use what you have. Make sure that you do not use fabric softeners, bleach, or dryer sheets. These are all bad for your diapers. Simply wash the diapers with about 1/4 of the amount of recommended detergent. Many people have had luck washing their diapers in Tide. When I first started cloth diapering I just used regular detergent (eco-friendly brand from Sams club) and it worked fine. Line drying will prevent stains (you may not care about them on the blankets but you will later with "real" diapers and it saves money. Always line dry your diapers covers or dry them on very low heat, otherwise they can get ruined.

    What about being out of the house?
    Use the diapers as usual when you are out of the house. If you have extra disposables from last week you can use those, otherwise use the blankets/covers. Use a plastic bag to put the dirty diapers in. In a couple of weeks you will be buying a wetbag but for now just use the plastic bag. Make sure it has no holes in it or double up.

    Other cheap cloth diapering ideas:
    Check out diaperswappers for pre-owned diapers. After you sign up make sure to check the FFS (free for shipping) category. This stuff goes fast but a lot of times they have FFS lottos that you can sign up for, many of them are only for those who truly need diapers. There is a LOT of drama on this site and if you want to avoid that stick with the FSOT (for sale or trade) part only.
    The Cloth Diapering Foundation does diaper grants to those who really need them. I don't know much about it, but check it out. :)
    Make your own! There are lots of sites with diaper patterns if you are crafty enough.

    So there you have week one. I just want to show how it's possible to cloth diaper on very little money. Next week (like I said before, I'm not actually posting these a week apart, they're just examples) you will be buying "fancier" pocket diapers.

    6/19/2011

    "A Day in the Life" Sign-Ups Still Open

    We are still searching for great women all around the world to star in our (coming soon) "A Day in the Life" feature of the week! If you don't know what it is, you can read all about it here. We've gotten a good amount of readers that have already signed up, but we're looking for more.

    If you're interested or you know someone that may be, you can email us or send us a message through our Facebook Page.

    We can't wait to post our first ever A Day in the Life feature!


    Copco Sierra Tumbler Review

    I mentioned a while back that I was going to buy some of these tumblers on Amazon whenever I got my gift card from Swag Bucks. The prices on Amazon vary but I managed to get two (pink and blue) for about $5 each. Now that I have used them I have to say I really like them! I love the built in stirrer and they're pretty hard to spill. I also like that the straw can't fall out because of the stirrer, so it's harder to lose. I think that these are great because you can take them with you without wasting money on drinks. I've used them for water and tea so far. It also saves on plastic bottles and cans. They are reasonably priced and it seems like they will hold up pretty well over time. The colors are really nice and the cups are a good size (24 oz)  I give these a 10/10 and would recommend them to anyone looking for a money saving/eco-friendly drink solution.


    **Note: I bought these Tumblers with my own money and was not compensated in any way for my review.**

    Happy 3rd Birthday Luke!!

    Happy 3rd Birthday Luke!!


    Meagan's cute little boy, Luke, is turning 3 today. Make sure to wish him a happy birthday! It seems like just yesterday Meagan and I were both pregnant with Luke and Kainan. They are growing up so fast.

    6/14/2011

    My experience with making laundry soap

    Since Meagan posted about making laundry soap I had been wanting to try it. I was just waiting to run out of my regular laundry detergent (All Free&Clear) so that I could use the container for storing my homemade soap. Although the original "recipe" calls for using Fels-Naptha soap I heard that it can be harsh on babies skin. My babies do have sensitive skin so I wanted to be careful. I read that a lot of people use a bar of Dr. Bronners soap so I decided to try that. I used a $5 gift card purchased with Swagbucks and bought the bar of soap (it was about $4.) The washing soda and borax were things that I already had, I bought them at a local grocery store. I had also previously bought some bars of Fels-Naptha. I did use some of the bar of Fels-Naptha (just a little) and the entire bar of Dr. Bronners. I followed the directions exactly and everything seemed fine. I decided to try to liquid version (Meagan uses the powder) because it lasts longer. Everything went fine making the soap until the end. You are supposed to put it in a 5 gallon bucket to "thicken" overnight. Well, it didn't thicken. It also didn't "gel" when I put it in the old  detergent container. I'm not sure why, because I followed the "recipe" exactly. I know others who have used Dr. Bronners without having this problem, so I don't think it's the soap. I used it today to wash a load on laundry and they are clean, so I guess that's what matters! I recommend that anyone tries this, whether you use the liquid or powder recipe it will save a lot of money on laundry detergent.


    Design by Free WordPress Themes | Bloggerized by Lasantha - Premium Blogger Themes | Hot Sonakshi Sinha, Car Price in India